DevOps是Development和Operations的组合,是一种方法论,是一组过程、方法与系统的统称,用于促进应用开发、应用运维和质量保障(QA)部门之间的沟通、协作与整合。以期打破传统开发和运营之间的壁垒和鸿沟。Git更是现在日常开发必不可少的代码管理工具。本文主要介绍使用GitLab 来做项目CI/CD。
Gitlab CI/CD 简介
传统的 CI/CD:搭建一个 Jenkins,在 Jenkins 配置好基本的环境,如 Java, Maven, Git 等等,接着开始配置任务,项目 A 的代码在哪里?怎么 Build?项目 B 的代码在哪里?怎么 Build?触发周期是多少?细节挺多的,通常需要专门的管理员去维护这个 Jenkins。
Travis CI/CD 颠覆了这种模式,在 Travis CI 的模式中,开发在源码根目录下放置 CI 的配置(通常是一个 yml 文件,描述了基本的 build 命令),Travis 会解析这个文件然后执行具体的 CI 任务。
GitLab CI/CD 实际上就是照搬了 Travis CI 的模式,它只需要开发者在自己需要 CI 的代码库中放一个 .gitlab-ci.yml 文件即可完成自己的CI任务配置
使用Gitlab CI/CD 的好处
代码提交到 GitLab 了,git push 之后直接触发 CI/CD。
使用 Gitlab CI/CD
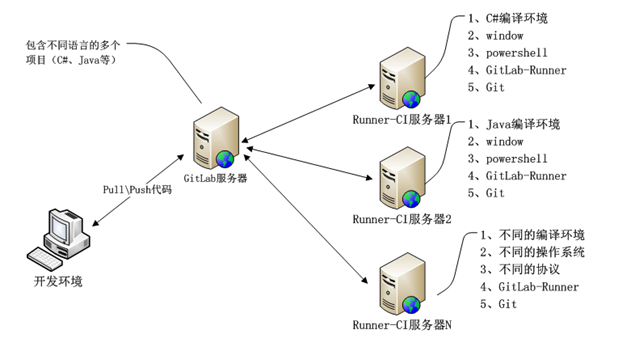
GitLab CI/CD 运行示意图如下所示:
- 编写GitLab CI/CD 配置文件**.gitlab-ci.yml**。 代码开放完之后push 到GitLab服务器
- GitLab 会检测到代码变动,根据**.gitlab-ci.yml**的配置分发任务到GitLab Runner 来执行CI/CD任务
下面分别简单介绍**.gitlab-ci.yml** 编写,以及GitLab Runner安装与运行
GitLab CI/CD Pipeline Configuration: .gitlab-ci.yml
.gitlab-ci.yml主要描述了CI/CD任务的执行顺序,主要包括以下两个方面:
- 使用GitLab Runner执行什么?
- 条件分支控制,如:当某个流程失败或成功时应该干啥
.gitlab-ci.yml 概览
一个 .gitlab-ci.yml 主要由default、variables、stages、 jobs 构成,示例如下:
default:
  image: ruby:2.5

variables:
  DATABASE_URL: "postgres://postgres@postgres/my_database"

stages:
  - build
  - test
  - deploy

build_job:
  stage: build
  script: "execute-script-for-build_job"
  only:
    - develop
    - master

test_job:
  stage: test
  script: "execute-script-for-test_job"
  only:
    - develop
    - master

deploy_job:
  stage: deploy
  script: "execute-script-for-deploy_job"
  only:
    - master
Jobs
GitLab CI/CD任务由一个或多个Job构成。job 定义如下所示:
job1:
  script: "execute-script-for-job1"

job2:
  script: "execute-script-for-job2"
其中,job1、job2为job 名称,可以自定义,但必须保证唯一,且不能为保留关键字:default 、image、services、stages、types、before_script、after_script、variables、cache、include
default: 设置job 的全局参数
default 可设置的全局参数包括:
设置的全局参数可以被job 内的参数覆盖,示例如下:
default:
  image: ruby:2.5

# use default
rspec:
  script: bundle exec rspec

# use specified image ruby:2.6
rspec 2.6:
  image: ruby:2.6
  script: bundle exec rspec
services
用来指定job 依赖的service docker image
before_script 和 after_script
before_script 用来描述每个job 执行之前需要做的工作。 after_script 用来描述每个job执行完成之后需要做的工作。 before_script 和 after_script 都可以在job 参数里面进行重写。
default:
  before_script:
    - global before script

job:
  before_script:
    - execute this instead of global before script
  script:
    - my command
  after_script:
    - execute this after my script
stages
stages 是全局的, 用来描述由哪些stage(在job中引用)。stages 中元素的顺序指定了job的执行顺序, 如下所示。
stages:
  - build # all jobs of build are executed in parallel.
  - test # If all jobs of build succeed, the test jobs are executed in parallel.
  - deploy # all jobs of test succeed, the deploy jobs are executed in parallel.
# if all jobs of deploy succeed, the commit is marked as passed.
# If any of the previous jobs fails, the commit is marked as failed and no jobs of further stage are executed.
另外,需要注意以下两点:
- .gitlab-ci.yml中如果没有定义stages, 则在job中可以使用默认的 build、test 和 deploy stage
- 如果job 中没有指定stage,则默认使用test stage
only/except
only 指定job只在特定的branch 上执行,支持正则表达式。 except 指定job在指定branch之外的分支上执行,支持正则表达式。
job:
  # use regexp
  only:
    - /^issue-.*$/
  # use special keyword
  except:
    - branches
.gitlab-ci.yml 详细配置可以见 https://docs.gitlab.com/ce/ci/yaml/README.html
Gitlab Runner
GitLab Runner 是使用Go 编写的一个开源项目,主要用来执行GitLab CI/CD 任务并且返回结果至GitLab。
GitLab Runner 可以运行在物理机、Docker容器、以及Kubernets集群中。 下面主要介绍下使用binary在物理机(CentOS Linux)上安装的方法和使用Docker Image安装的方法。更多安装方法见:https://docs.gitlab.com/runner/install/
使用binary在物理机(CentOS Linux)上安装GitLab Runner
# 下载rpm 包
curl -LJO https://gitlab-runner-downloads.s3.amazonaws.com/latest/rpm/gitlab-runner_amd64.rpm

# 安装
rpm -i gitlab-runner_amd64.rpm

# 注册至GitLab
# 使用Docker 来运行Integration-test: https://docs.gitlab.com/ce/ci/docker/using_docker_images.html
# The registered runner will use the ruby:2.1 docker image and will run two services, postgres:latest and mysql:latest, both of which will be accessible during the build process.
sudo gitlab-runner register \
  --non-interactive \
  --url "https://gitlab.com/" \
  --registration-token "PROJECT_REGISTRATION_TOKEN" \
  --description "docker-ruby-2.1" \
  --executor "docker" \
  --docker-image ruby:2.1 \
  --docker-services postgres:latest  \
  --docker-services mysql:latest \
  --tag-list "docker,ruby2.1"
使用Docker Image安装GitLab Runner
# 安装Docker
curl -sSL https://get.docker.com/ | sh

# 运行gitlab-runner 容器
docker run -d --name gitlab-runner --restart always \
  -v /srv/gitlab-runner/config:/etc/gitlab-runner \
  -v /var/run/docker.sock:/var/run/docker.sock \
  gitlab/gitlab-runner:latest

# 注册runner
docker run --rm -v /srv/gitlab-runner/config:/etc/gitlab-runner gitlab/gitlab-runner register \
  --non-interactive \
  --executor "docker" \
  --docker-image alpine:latest \
  --url "https://gitlab.com/" \
  --registration-token "PROJECT_REGISTRATION_TOKEN" \
  --description "docker-runner" \
  --tag-list "docker,aws" \
  --run-untagged="true" \
  --locked="false" \
  --access-level="not_protected"
查看Gitlab Runner
在每个 GitLab Project 的 Settings -> Runners 可以看到Runners 信息

使用Gitlab CI/CD
只需要在自己需要 CI 的代码库中放一个 .gitlab-ci.yml 文件,push 之后就会自动触发GitLab CI/CD